Building a Rustic Charm: Your Handcrafted Crib Project
Hey there, fellow woodworkers! So, you're thinking about building a crib? That's awesome! There's something incredibly rewarding about crafting something so special for a little one. And a rustic crib? Talk about charm! This isn't your average, mass-produced piece of furniture. We're talking about a heirloom, something that will be treasured for generations. Let's dive into how you can build your own rustic masterpiece.
Planning Your Rustic Crib Adventure
Before you even think about touching a saw, let's get organized. This isn't just about throwing some wood together; we want a safe and beautiful crib. Safety is paramount, obviously. So, we'll be following all the relevant safety standards.
Choosing Your Wood
The rustic look lends itself beautifully to a variety of woods. Think about the feel you want: Pine offers a classic, slightly softer look and is relatively easy to work with. Reclaimed wood adds incredible character and a unique story to your piece. Oak offers durability and a richer, more substantial feel. Just remember to thoroughly check your wood for splinters, knots, and any potential hazards before you start.
Design Decisions: Size and Style
Standard crib dimensions are a good place to start, but don't be afraid to tweak them slightly based on your design vision. Consider the overall style â€" do you want a more minimalist look, or something with lots of decorative elements? Think about the height of the rails, the spacing between slats, and the overall aesthetic. Sketch it out! Get those creative juices flowing. A quick drawing can save you headaches later.
Gathering Your Tools and Materials
This is where things get exciting (and maybe a little overwhelming). Make sure you have all the necessary tools before you begin. Here's a basic list:
- Measuring tape and square
- Saw (circular saw, jigsaw, hand saw - depending on your comfort level and the type of wood)
- Drill and various drill bits
- Screws (wood screws, appropriate size and length)
- Sandpaper (various grits)
- Wood glue
- Clamps
- Safety glasses and hearing protection (seriously, don't skip this!)
- Wood finish (stain, paint, sealant â€" choose what fits your rustic style)
- Your chosen wood (remember to account for cuts and waste)
Construction: Bringing Your Vision to Life
Now for the fun part! The actual building process. This is where things get a bit more detailed, and I highly recommend finding detailed plans online or in woodworking books that specifically address crib construction. Remember, safety first! Don't rush this process; precision is key.
Building the Frame
Start with the crib's frame. This will typically involve constructing the headboard, footboard, and side rails. Ensure the joints are strong and secure. Use wood glue and screws for a robust connection. Pre-drilling pilot holes will prevent the wood from splitting.
Adding the Slats
The slats are crucial for both safety and aesthetics. Ensure the spacing between slats meets safety regulations (usually around 2 3/8 inches). The slats should be securely fastened to the frame, again using wood glue and screws. Make sure they're strong enough to withstand some serious bouncing!
Attaching the Rails
The side rails are probably the most important safety feature. They need to be sturdy and securely attached. Consider using adjustable rails to accommodate your child's growth. Many plans incorporate a drop-side mechanism; however, you need to research thoroughly and follow precise instructions to ensure it meets the latest safety standards.
Finishing Touches
Once the crib is assembled, it's time for the finishing touches. Sand everything down thoroughly to remove any rough edges or splinters. Apply your chosen finish â€" a rustic stain, paint, or sealant â€" to protect the wood and give it that beautiful, aged look. Remember to let the finish dry completely before assembling any hardware. You might want to add decorative elements, like rustic knobs or metal accents, to complete the look.
Safety First! Crib Safety Standards
This is the most critical part. Always, always, always prioritize safety. Before you even start, research the current crib safety standards in your region. These standards cover things like slat spacing, mattress support, and the strength of the frame. Don't skimp on safety. A poorly constructed crib can be dangerous.
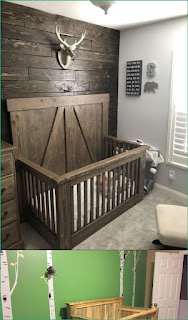
Showcasing Your Rustic Crib Masterpiece
Once your crib is complete, take a moment to admire your work! You've created something truly special â€" a beautiful, handcrafted crib that reflects your skill and love. Take plenty of pictures and share them with your friends and family. You might even consider entering it into a local craft fair â€" who knows, you might be the next big thing in rustic crib making!
Frequently Asked Questions
I know building a crib can raise a lot of questions. Here are a few of the most common ones:
Q: How long does it take to build a rustic crib?
A: This depends entirely on your experience level and the complexity of the design. Expect to spend anywhere from a weekend to several weeks, especially if you're a beginner.
Q: Can I use reclaimed wood for my crib?
A: Yes, you can, but make absolutely sure the wood is clean, free of toxins, and structurally sound. Reclaimed wood can contain old nails, screws, or other hazards. Thoroughly inspect and prepare the wood before using it.
Q: Are there plans available online?
A: Absolutely! There are many free and paid crib plans available online and in woodworking books. Just make sure you choose plans that meet current safety standards.
Q: What type of finish is best for a rustic crib?
A: A non-toxic, child-safe finish is essential. Many natural oil-based finishes are suitable, or you can use a high-quality, non-toxic paint. Always check the product label to ensure it's safe for children's furniture.
Q: Do I need to get my crib inspected?
A: While not always legally mandated, it's always a good idea to have your finished crib inspected by a qualified professional to ensure it meets all safety standards. Peace of mind is priceless.
Happy building, and remember to always prioritize safety! Your little one will cherish this handcrafted piece for years to come. Good luck, and let me know if you have any other questions!


0 comments:
Post a Comment